Internet Download Manager (IDM) is a tool to increase download speeds by up to 5 times, resume and schedule downloads. Comprehensive error recovery and resume capability will restart broken or interrupted downloads due to lost connections, network problems, computer shutdowns, or unexpected power outages. Simple graphic user interface makes IDM user friendly and easy to use.Internet Download Manager has a smart download logic accelerator that features intelligent dynamic file segmentation and safe multipart downloading technology to accelerate your downloads. Unlike other download managers and accelerators Internet Download Manager segments downloaded files dynamically during download process and reuses available connections without additional connect and login stages to achieve best acceleration performance.
Internet Download Manager supports proxy servers, ftp and http protocols, firewalls, redirects, cookies, authorization, MP3 audio and MPEG video content processing. IDM integrates seamlessly into Microsoft Internet Explorer, Netscape, MSN Explorer, AOL, Opera, Mozilla, Mozilla Firefox, Mozilla Firebird, Avant Browser, MyIE2, and all other popular browsers to automatically handle your downloads. You can also drag and drop files, or use Internet Download Manager from command line. Internet Download Manager can dial your modem at the set time, download the files you want, then hang up or even shut down your computer when it's done.
Other features include multilingual support, zip preview, download categories, scheduler pro, sounds on different events, HTTPS support, queue processor, html help and tutorial, enhanced virus protection on download completion, progressive downloading with quotas (useful for connections that use some kind of fair access policy or FAP like Direcway, Direct PC, Hughes, etc.), built-in download accelerator, and many others.
Version 6.04 adds IDM download panel for web-players that can be used to download flash videos from sites like YouTube, MySpaceTV, and Google Videos. It also features complete Windows 7 and Vista support, YouTube grabber, redeveloped scheduler, and MMS protocol support. The new version also adds improved integration for IE and IE based browsers, redesigned and enhanced download engine, the unique advanced integration into all latest browsers, improved toolbar, and a wealth of other improvements and new features.
DOWNLOAD HERE
Rabu, 26 Januari 2011
WinBOX
WinBOX is a Secure GUI/ Graphical Client used to configure MikroTik Appliances
Winbox version 2.2.16 has the following features;
* Discover MikroTik Routers /Switches /Appliances in yourcomputers subnet
* Connect to the MikroTik appliance using IP /layer 3 connection
* Connect to the MikroTik appliance using Ethernet /Mac /layer 2 connection
* Connections to the MikroTik appliance can be encrypted for added security
Quick Start Guide
1. Connect your Windows computer directly to the router with an Ethernet cable, or connect them throught a switch.
2. Run Winbox program (Download from above), then click the [...] button.
3. The Winbox tool should find your Router anddisplay it's MAC address. * (If not see some troubleshooting below)
4. Click on the mac address part of the trext in the scan window. This will load the mac address into the connect to text box.
5. Press Connect and the Winbox GUI interface will be loaded up.
6. It is always advisable to configure an IP address on the interface you are connected to on. Once you have a valid ip address on the router that is reachable by your PC you should close down Winbox and reconnect by entering the IP address into the conect to box in in the Winbox loader rather than the Mac address that you origionally connnected. the reason for this is whe connected via the Mac layer communication is carried out via broacast traffic. This is a very unreliable method and may cause unexected disconnects from time to time. When you connect via an IP address you will have a more stabe TCP router connection to the router.
* TroubleShooting
If the router is not showing up when you click the [...] button the following may be why:
1) Your Windows firewall may be blocking the Mac Broadcasting - Try turning off your firewall both the windows or any other commericial one that you may have installed, and or try adding winbox to the exception list in your firewall
The above is a tempory fix as it is adisable to configure your firewall to allow the winbox tool to work.
2) Another possible problem is if you are connected throught a managed switch that has broadcast storm control features it may be required to relax the broadcast threshold on the switch as a switch may mistake the large amount of broadcast traffis as a misconfigured network and start to block the traffic
DOWNLOAD HERE
Kamis, 06 Januari 2011
Under the hood of Google Maps 5.0 for Android
Under the hood of Google Maps 5.0 for Android
Friday, December 17, 2010 | 10:50 AM
(Cross-posted from the Official Google Blog)
Yesterday we introduced Google Maps 5.0 for Android with two significant new features: 3D interaction and offline reliability. In order to create these features, we rebuilt Maps using vector graphics to dynamically draw the map as you use it. Building a vector graphics engine capable of achieving the visual quality and performance level you expect from Google Maps was a major technical challenge and enables all sorts of future possibilities. So we wanted to give you a closer look under the hood at the technology driving the next generation of mobile maps.
Vector graphics
Before diving into how Maps uses vector graphics, it may be helpful to understand how maps were created before. Previously, Google Maps downloaded the map as sets of individual 256x256 pixel “image tiles.” Each pre-rendered image tile was downloaded with its own section of map imagery, roads, labels and other features baked right in. Google Maps would download each tile as you needed it and then stitch sets together to form the map you see. It takes more than 360 billion tiles to cover the whole world at 20 zoom levels!
Now, we use vector graphics to dynamically draw the map. Maps will download “vector tiles” that describe the underlying geometry of the map. You can think of them as the blueprints needed to draw a map, instead of static map images. Because you only need to download the blueprints, the amount of data needed to draw maps from vector tiles is drastically less than when downloading pre-rendered image tiles. Google Maps isn’t the first mobile app to use vector graphics—in fact, Google Earth and our Navigation (Beta) feature do already. But a combination of modern device hardware and innovative engineering allow us to stream vector tiles efficiently and render them smoothly, while maintaining the speed and readability we require in Google Maps. Just try it out and see for yourself!

See the difference between image tiles (left) and vector tiles (right) tilted to show 3D buildings.
One map, many perspectives
Using vector tiles instead of image tiles gives Maps the flexibility to re-draw the same map from different perspectives using the same set of data. Zooming is one example of this at work. If you magnify an map image tile by 2x, lines such as roads and text would get twice as wide and appear blurry. As a result, we had to constrain Maps to 20 fixed “zoom levels,” each one twice as close as the last. Every time you zoomed in further, you’d need to download a completely new set of image tiles. It took time to load new data over a mobile data connection, and would fail when you lost your connection in a subway or large building.


Compared to image tiles (left), vector tiles (right) keep lines and labels crisp as you zoom.
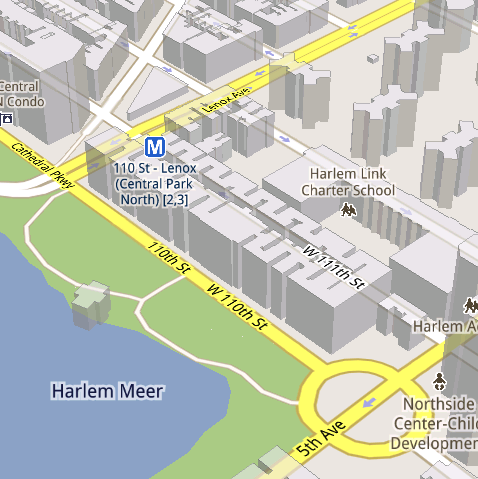
We can also display entirely new levels of detail that weren’t possible with flat image tiles. For example, in the 100+ cities where we have 3D building data, each building is drawn in 3D using a polygonal building footprint and heights for different parts of the building. And with tilt and rotate, you can see them from a variety of different angles.
Reading the map
Just like other map features, labels are dynamically drawn so they continue to face you and stay legible if you rotate the rest of the map or use compass mode. Maps also “chooses” the best labels to show you based on several factors. You’ll notice labels fade in and out as you interact with the map so that the most useful ones appear and the map never gets too cluttered.


See the difference between rotating maps with static labels (left) and dynamic labels (right).


Previously, map features like labels and traffic could conflict (left) instead of blend seamlessly (right).
Offline reliability
Vector graphics also enable another significant new feature: the ability to continue viewing maps even when you have poor—or no—network connections. Because each vector tile works across multiple zoom levels, it requires more than 100 times less data to view maps across all zoom levels than before, allowing Maps to cache much larger areas of the map on your device.
With this first version, Maps proactively caches map data for the places you use Maps the most—where you’re actively using it as well as places for which you search or get directions. Then when you’re plugged in and connected over WiFi, caching happens automatically. Near your frequent places, you’ll get detailed vector tiles for city-sized regions so you can see every road labeled. Further away, you’ll have less detail but will typically have towns and highways labeled for miles. We’re continuing to work on these algorithms, so you’ll see improvements over time.
Offline rerouting
With Google Maps Navigation (Beta), you’ll also see the benefits of additional caching with offline rerouting. This feature is only possible because Navigation caches not only map data but also data like turn restrictions for the areas surrounding your route. You’ll still need to be connected when you first start a trip to download and cache your route. But this way, even if you take a wrong turn after losing your connection, Navigation can use the cached data to get you back on your way. We will be rolling this feature out gradually over the next few weeks.
This is just the start, and we’re really excited about all the possible ways to use vector graphics technology for the next generation of Google Maps. So please stay tuned!
Update (12:47pm PST): Tweaked the description of the difference between image maps zoom levels.
A Sneak Peek of Android 3.0, Honeycomb
The past few weeks have been exciting ones for the Android team: we recently released Nexus S and Android 2.3, Gingerbread, and we’ve even had some of our most popular team members take a trip to space. But we haven’t stopped buzzing with excitement: today at the Consumer Electronic Show (CES) in Las Vegas, we previewed Android 3.0, Honeycomb.
Honeycomb is the next version of the Android platform, designed from the ground up for devices with larger screen sizes, particularly tablets. We’ve spent a lot of time refining the user experience in Honeycomb, and we’ve developed a brand new, truly virtual and holographic user interface. Many of Android’s existing features will really shine on Honeycomb: refined multi-tasking, elegant notifications, access to over 100,000 apps on Android Market, home screen customization with a new 3D experience and redesigned widgets that are richer and more interactive. We’ve also made some powerful upgrades to the web browser, including tabbed browsing, form auto-fill, syncing with your Google Chrome bookmarks, and incognito mode for private browsing.
Honeycomb also features the latest Google Mobile innovations including Google Maps 5 with 3D interactions and offline reliability, access to over 3 million Google eBooks, and Google Talk, which now allows you to video and voice chat with any other Google Talk enabled device (PC, tablet, etc).
Please stay tuned for more Honeycomb news from the Android team. For now, you can get a taste of Honeycomb by checking out this video.
Minggu, 02 Januari 2011
HP Pavilion dv7

Hewlett-Packard memposting rincian spesifikasi dua model laptop Pavilion dv7 mendatang, yang telah dilengkapi dengan prosesor Intel generasi baru Sandy Bridge. Meski beberapa rincian telah terkuak melalui laporan yang berasal dari Engadget, halaman web produk HP untuk wilayah AS kini menampilkan tabel spesifikasi model laptop mendatang mereka.
Intel telah mengirim prosesor kepada produsen PC, artinya ketika teknologi prosesor terbaru diumumkan secara resmi pada Consumer Electronic Show tanggal 5 Januari, sistem akan siap didistribusikan.
Salah satu model menggunakan prosesor Core i7-2820QM 2.3GHz yang dilengkapi dengan kecepatan SC Turbo hingga 3.4GHz. Teknologi Intel Turbo Boost bermanfaat untuk mempercepat dan memperlambat prosesor sehingga kinerja dan konsumsi listrik menjadi lebih optimal. Model lain menggunakan prosesor Core i7-2630QM dengan kecepatan SC Turbo hingga 2.9GHz.
Kedua prosesor memiliki Thermal Design Power atau TDP sebesar 45 watt. Umumnya, prosesor laptop mainstream Intel memliki TDP mencapai 25 atau 35 watt dan semakin tinggi TDP semakin tinggi potensi panas yang dihasilkan oleh prosesor.
Seperti pada seri dv7 sebelumnya, beberapa model telah dilengkapi dengan port USB 3.0 SuperSpeed disamping port standar USB 2.0. Kecepatan data yang dapat dihantarkan melalui USB 3.0 secara teori mampu mencapai 5 gigabit perdetik, sekitar 10 kali lebih cepat dari USB 2.0.
Dalam daftar, sistem mengunakan prosesor grafik buatan Advanced Micro Device seri ATi Mobility Radeon HD 5650 dan Radeon HD 5470.
android in space
Here at Google, we’re all about exploration. It’s no surprise that some of our favorite products are built to let you explore the world in ways never before possible. Google Maps lets you find your way all around the world. Google Earth lets you explore the planet in detail, complete with trees and oceans. And Google Sky Map lets you explore the skies right from your Android device. Well, we wanted to do a little exploring of our own, so we decided to venture into near space, with the help of some Androids.
Recently, we travelled to Ione, CA and sent seven payloads up, up, and away into near space, each equipped with a Nexus S. We took some cues from others who have sent homemade weather balloon rigs far up, and we wanted an opportunity to collect some interesting data about the sensors in Nexus S – GPS, gyroscope, accelerometer, and magnetometer. We also couldn’t resist what looked like a great way to spend a weekend. Sending the balloons up also gave us an opportunity to capture some stunning imagery and videos of Earth. Take a look at unaltered footage of an Android at over 100,000 ft above the Earth’s surface:
The Rig
How did we get our little Android commanders that high up? Well, first the Android platform provides a robust development environment and Nexus S has a great set of embedded sensors, both of which made it easy for us to write the apps we needed for this project. Going forward with other similar projects we have an open environment that we can modify at any level necessary. We then worked with UCSC student Greg Klein to prepare each of the payloads, which were housed in foam coolers. We secured a nylon load line to the cooler and attached to it a radar reflector, a parachute, and finally, a weather balloon. Every payload had an APRS transmitter attached to a GPS that was known to work at high altitudes, as well as batteries for power. The remainder of each payload was different for each balloon: some had digital cameras taking pictures and some had video cameras mounted at various angles (up, down, and at the horizon).
These phones were running a variety of apps: Google Maps for Mobile 5.0 (with offline map data) which allowed us to see what was directly below the balloon, Google Sky Map to see if we could identify the real stars in the backdrop, Latitude to report location when the phones had a data connection, and our own custom sensor logging app that sampled all the available sensors on the device. We even manned our payloads with some special astronauts: small Android robots, and boy did they fly. Check out an in-depth look at how we prepared and launched the payloads:
Langganan:
Komentar (Atom)